Category Archives: Uncategorized

10 Safety Tips to help protect you this Thanksgiving!

With Thanksgiving just hours away, our staff members are preparing for a wonderful holiday with their families and friends, just like you. As experts in evaluating risk, though, every member of our team understands that this wonderful holiday must also be treated with caution.

This is because Thanksgiving can be just as stressful and even risky as it is joyous; this fact is further highlighted by several Thanksgiving-related statistics:

-MORE COOKING-RELATED HOME FIRES OCCUR ON THANKSGIVING THAN ON ANY OTHER DAY – in fact, the number of filed cooking or grease related claims climb more on Thanksgiving than other day in November.

Image result for thanksgiving fire

-THANKSGIVING IS THE MOST POPULAR HOLIDAY FOR TRAVEL IN THE COUNTRY; more people on the roads, in a rush to reach their destinations, inevitably leads to a higher number of accidents.

Image result for thanksgiving travel

-WITH A NUMBER OF GUESTS COMING INTO HOUSEHOLDS ON THIS HOLIDAY, the number of claims for slips and falls on or close to Thanksgiving is also on the rise.

Image result for thanksgiving dinner table with people

 We know that it can seem a little daunting at first to think of Thanksgiving, a time of celebration, as a risky holiday. Fortunately, a few simple precautions can help keep you, your family, and your guests perfectly safe this holiday season, allowing you to enjoy yourself without trouble. Here are our top ten safety tips for this Thanksgiving:

  1. As you travel, give yourself some extra time to navigate the traffic. Do not drive recklessly; with more accidents than usual happening on the road right now, you want to keep yourself and your passengers as safe as possible.
  2. If you’re cooking or hosting, be alert as to what’s happening in your kitchen at all times; the last thing you want is for a guest who wanders into the kitchen to accidentally burn themselves on the stove or the pan you just pulled out of the oven.
  3. Check your smoke alarm batteries before you begin cooking.
  4. Use alarms and timers to ensure that nothing stays in the oven too long; then, as you move items in and out of the ovens, watch to make sure that your wrappers, dish towels and other fabrics and flammable items are far away from an ignition source.
  5. While we don’t recommend them due to the danger they pose, if you’re using a fryer, keep it in an open away – never in, on or under things like garages, porches, or other flammable structures near your home – and don’t leave the fryer unattended for any reason. Monitor the temperature of the fryer frequently as well. Never fry a turkey indoors.Image result for thanksgiving fire
  6. Follow the cooking directions; they exist for a reason. For example, you need to completely thaw and dry a turkey before cooking it because partially frozen or wet turkeys can result in hot oil splatters later in the process.
  7. Move slowly when picking up or lowering food; don’t risk splattering hot oil or grease by moving too quickly.8.
  8. Keep your skin covered to reduce the risk of being burned from any accidental hot liquid splatter – but don’t wear lose, baggy clothing, either: you don’t want your sleeves dangling somewhere they shouldn’t be!
  9. Keep in mind that you are responsible for the well-being of any guest at any age while they are on your property. Make guests aware of any slippery surfaces when they arrive, and remove any potential hazards in your home – from candles to sharp or fragile objects – from immediate reach while you have company.
  10. Keep pets as far away from the Thanksgiving preparations and food as possible. Not only does the kitchen pose a danger should anything hot or heavy fall onto a pet, but our Thanksgiving meals are often dangerous for pets; a lot of the food we eat either can’t be digested, or includes bones, which are major health hazards. Don’t risk the vet visit: keep your pets in a separate part of the house this holiday.

Tips For Winter

Tips For Winter!

Just because we’ve had record high temperatures in the past several years and general worrisome warming trend doesn’t mean that winters are going to get any easier in the Northeast. Now that cold weather is upon us, get your home buttoned up and ready for it with our expert hands-on game plan, which will not only make your home more comfortable and energy efficient, but save you some money while you’re at it. From big changes that will knock hundreds of dollars off your energy bill to smaller ones that need just a bit of elbow grease and a few materials from your local hardware store, we’ll show you what you need to get the job done! So no matter if you rent or own your house, check out these 7 handy tips that we promise will make a real difference in keeping you warm and your energy bill manageable this winter.

TIP 1: Get an Energy Audit

Before we get into the nitty-gritty, we should mention that the best way to get your home operating at its maximum efficiency is to hire a professional BPI certified energy rater to evaluate your spaces. This person will conduct what’s called an “energy audit” and he or she will test your home for energy losses and safety issues, and generate a detailed report highlighting what your home’s issues are. With a report in hand you can easily target and prioritize exactly what you need to do, and what you can afford to do.

If you can’t afford an energy audit, you can start to identify and remedy some problem areas on your own with the help of an infrared thermometer, like the Ryobi Non-Contact Infrared Thermometer. This handy gun allows you to safely measure surface temperatures and pinpoint spots where your home is experiencing air leaks or missing insulation. As energy efficiency expert David Johnson says, “Air leaks account for 25-30% of an average energy bill, and this is one of the most profound steps that you can make for the betterment of your home’s comfort and reducing the amount of your monthly bill.”

Our tips ahead will address common problem areas seen in all types of homes, and they will offer solutions to problems that can be easily fixed, often without calling on help from a professional.

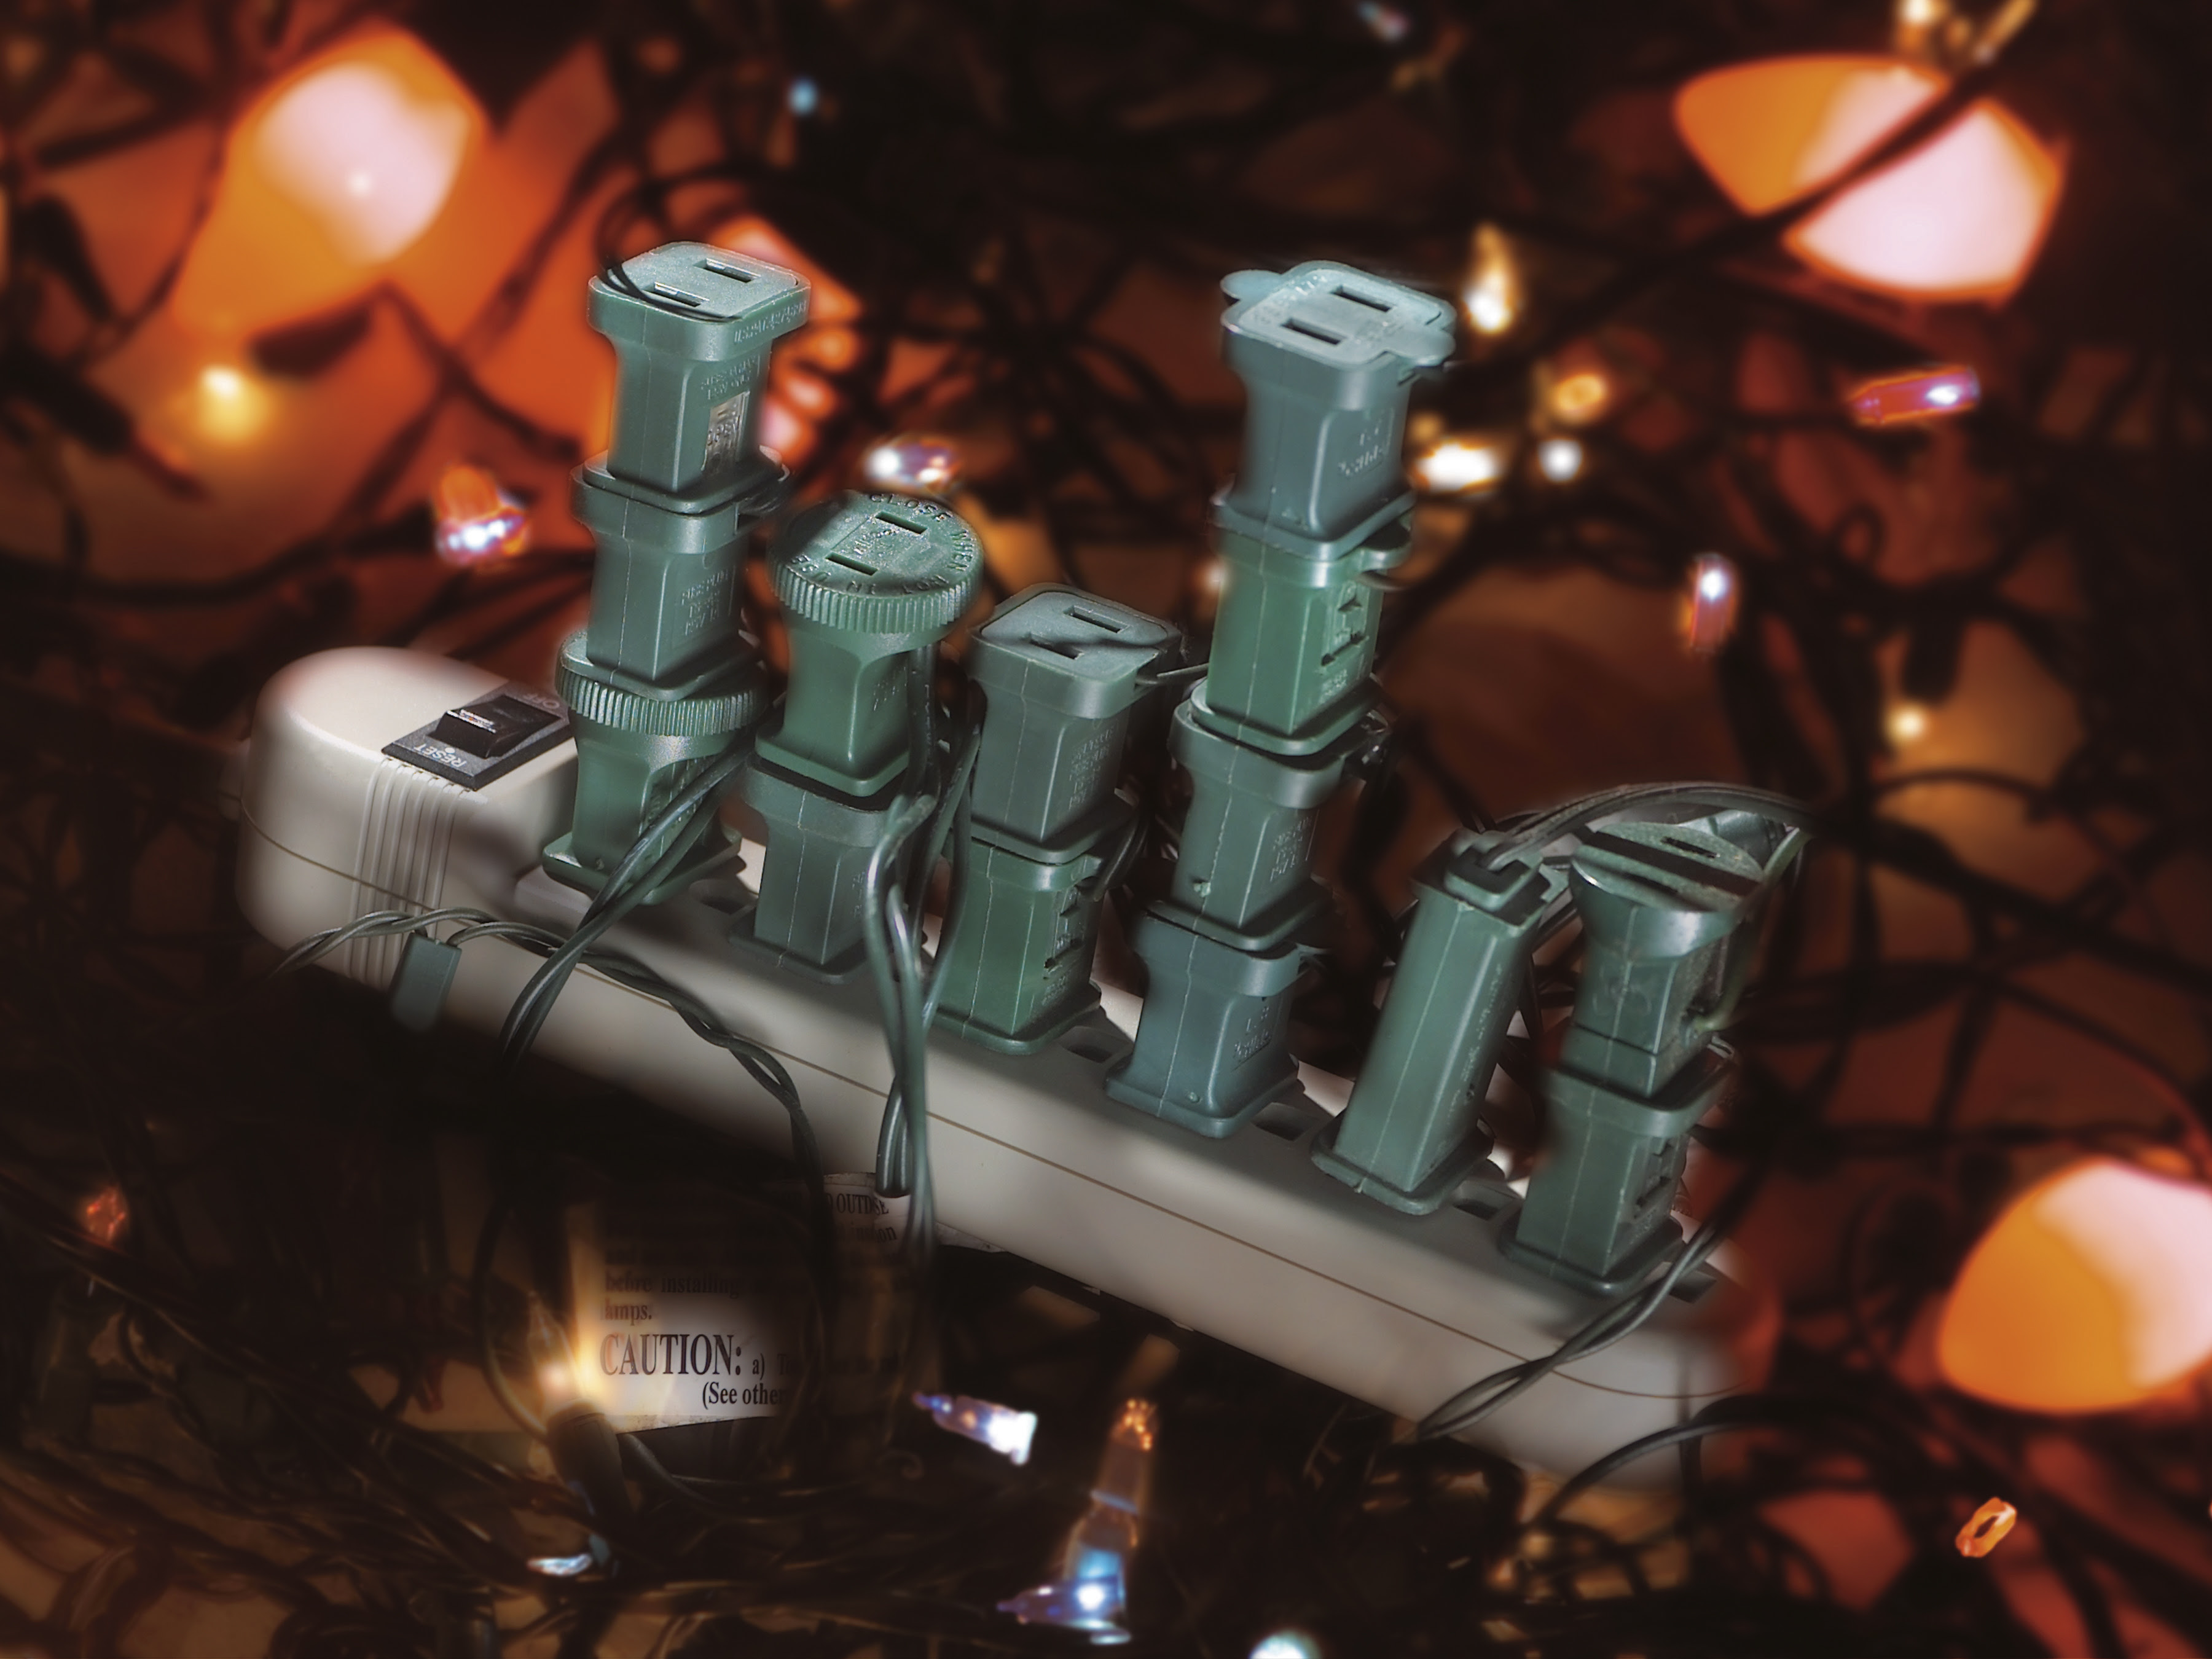
TIP 2: Seal Your Walls

The mantra in green construction is: “seal it tight, ventilate right”. The sealing part is about getting a handle on all the places where air penetrates through the wall and causes drafts and fluctuations to the temperature inside your home. A simple tube of high quality caulk and a plan to tackle all those problem areas can go a long way if you know where to look (hint: grab your infrared thermometer).

What keeps the outside air out of your home is typically the interior walls (or drywall), but you’ll find many holes that have been cut out of these walls to install your plugs and switches. If you have ever removed the face-plates of  these plugs and switches during cold weather, you’ll have probably noticed some cold air pouring out. Reduce this leakage by using caulk to seal around the the area where the electric box meets the drywall. If you’re comfortable working around electricity, head to the breaker, turn it off, then test the outlets to make sure they are really off. Once off, you can then pull them out of the box and begin to seal up all the little holes in the back of the box, including where the wires come through.

TIP 3: Seal Your Home’s Can Lights

Other notorious culprits that contribute to air leaks are recessed lights found in the ceiling. Many old can lights are actually vented on purpose to keep from being overheated by the lightbulb (they are called non-IC or non-insulation contact rated cans). Because warm air rises, an unsealed can light below a roof is a big problem. It’s a good idea is to remove the existing ring of this can and seal the can’s perimeter with caulk. The inside of the can should be sealed with either caulk or aluminum tapeto keep your home’s warm air from escaping into the attic.

It’s very important that you not put an incandescent bulb in the can. Instead, opt for something like a Cree LED recessed light — this light is dimmable, super-efficient and does not build up heat. Moreover, if you have a non-IC rated can, it’s a really good idea to put a note inside to not use incandescent lights in the future. An overheated fixture has the potential to cause serious problems. If you can’t give up your incandescent, another approach is to go into the attic, install and seal a box made from drywall around the light, and then insulate from above. This has the added benefit of improving you r-value, or insulating effectiveness.

TIP 4: Look For Insulation Gaps

Anywhere you have something that penetrates the wall, there is bound to be an air leak. Check out the outside faucets, air vents and plumbing for large gaps where air can escape. Seal the penetrations with expanding foam so that every nook and cranny is filled. Be careful to never seal next to a gas flue or you will have a fire hazard on your hands.

Once that is done, if you are ready to get dirty, check out where the foundation meets the house and crawlspace and fill those little forgotten cracks — note areas where you see even the slightest bit of daylight passing through. There is even an expanding foam for the big holes and a fire block version for holes between floors or for sealing electrical boxes. We also recommend practicing on a scrap surface to see how the foam works. Remember to wear gloves when using the foam — this stuff is really sticky before it sets!

While expanding foam is ideal when dealing with air leaks, spray-and-go won’t always work with those extra big gaps. In spots that need an extra bit of air-stopping artillery, we recommend rolling out some insulation. But before grab for that pink stuff on the shelf — a.k.a. fiberglass insulation — we recommend that you consider using Ultratouch denim insulation instead. Unlike its counterpart, Ultratouch is made from high-quality natural fibers (80% of which are post-consumer recycled) that provide for extremely effective sound absorption and good thermal performance. You also won’t have to worry about getting the “fiberglass itch” with the denim insulation; it is easy to handle and work with — but we still recommend using a mask. The perforated batts make off-size cavity installation easy. Simply measure, tear, carefully fit and cover with an air tight barrier and you are good to go.

TIP 5: Check and Tune-up Your Heating System

Before the start of the cold season, it’s not a bad idea to tune up your furnace. 30% of an average home’s energy costs are related to heating, and this number can spike further if you have inefficiencies with your furnace or boiler system. The first place to start is by replacing the filter at the beginning of the season and every couple of months while you run the furnace. When purchasing a new filter, note that the cheap ones are made just to protect the furnace fan motor, so make sure to get a more efficient and healthy pleated filter for improved air quality.

A tune-up is a good way to cut down on energy, prevent carbon monoxide leaks, and keep the air inside your home safe and healthy for you and your family. A tune-up should be a top priority, especially given that your furnace or boiler system will be running at full blast for months to come — you don’t want it to give out right when you need it the most! While the cost of a tune-up may at first glance seem like an unnecessary expenditure, keep in mind that small problems can easily turn into much larger, expensive replacements down the road. A new furnace is a substantial financial investment — regular maintenance postpones its replacement.

Image: Early morning frosty winter view through a window via Shutterstock

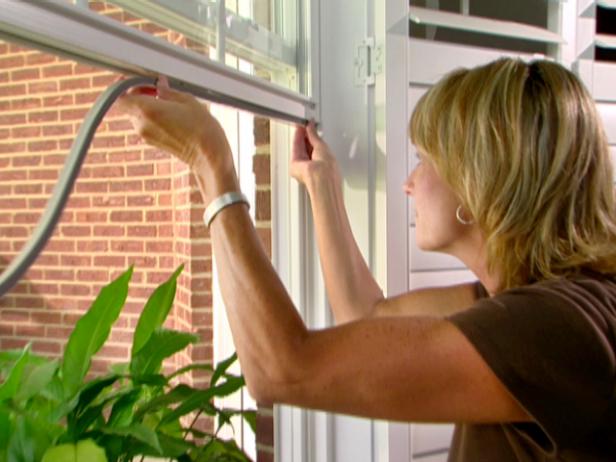
TIP 6: Check Your Windows

Windows that are unsuited for a home’s local climate can be a big contributor to inefficiency. If you live in an area that gets especially cold in the winter, investing in windows with insulated glass that’s double-paned or even triple-paned has the potential to transform the comfort of your home and your energy bill.

There are three main types of windows that are available on the market today and they include single-pane, double-pane, and super-triple-pane windows. Single- and double- pane windows are common in older houses, but windows in newer homes are commonly treated with Low-emittance(low-E) coatings (this can include both super windows and double pane windows). Low-E coatings are microscopically thin, virtually invisible, metal or metallic oxide layers deposited on a window to suppress radiative heat flow. The coating keeps radiant heat on the same side of the glass from which it originated, all while letting visible light pass — which means in the winter heat is reflected in, and in the summer heat is reflected out. Different types of Low-E coatings have been designed to allow forhigh solar gain, moderate solar gain, or low solar gain, and their application will depend on what region your home is located.

Super windows are a more recent development that feature a third pane of treated glass, and in some cases boast a krypton/argon/air gas mix in between the panes. When it comes to thermal performance, these windows are second to none and they can reduce your energy bill by hundreds of dollars. The choices can be daunting when selecting new windows and payback long, so make sure to do diligent research and ‘tune’ your windows to take advantage of solar heat.

While new windows would be great for everyone, we understand that they are a hefty investment that require a lot of technical analysis from a skilled professional. Moreover, new windows can often be just marginally more efficient than old ones (compared to your wall’s r-value for instance). Energy efficiency is about looking at the home as a system, and this is a long-term investment you shouldn’t be hasty or thrifty about. Get an energy audit before you make the plunge into making any window replacement.

With that said, there are many improvements that you can make to what you already have. They require just a little effort, but can pay out big in cash savings and improved comfort. More simple remedies can easily be found on the shelves of your local hardware store. Purchase some caulk and cellular shades (insulating blinds) to really increase efficiency. Use caulk to seal the window frame, and then setup your cellular shades. These shades are easy to install and work by creating pockets of air to insulate windows from the cold. A good set of shades can double or triple a window’s performance making these a no brainier for winter comfort and energy savings.

TIP 7: Install a Smart Thermostat

Ok, so you got through the grunt work, now its time to put in some sexy technology to really save some energy. Programmable thermostats (or t-stats) have gotten a bad rap for being difficult to use, and the EPA has yanked their Energy Star designation as a result. However, there are new, much more intuitive designs out there, like the Wi-Fi enabled Honeywell t-stat. Honeywell’s model not only lets you control the device from your iPhone or computer, but it tells you when there are significant temperature swings coming and even when the filter needs to be changed.

Programmable thermostats come in many varieties and price ranges, and getting one can save the average household about $180 a year if it’s used right. The idea is simple: these smart devices allow you to optimize your home’s energy-efficiency by setting pre-programmed temperatures for different situations, seasons and times. For example, you probably don’t want to be paying for heat during the day when you’re not even there, right? You can set your programmable thermostat to automatically turn down the heat during those hours and turn it up when you and your family come home to save money and energy.

For even more energy-saving products, visit Home Depot’s EcoOptions website.

7 ways to prevent Halloween-related claims

By Caterina Pontoriero


Image result for halloween

Halloween is a scary holiday, but even the goriest costumes or darkest haunted houses aren’t as scary as the risks insureds need to protect themselves against, such as fire, distracted driving, vandalism and theft.

According to claims data from New York City-based Travelers Cos., on average there are 24 percent more crime-related claims on Halloween than any other day of the year. Of those claims, 19 percent are related to vandalism and “malicious mischief,” 21 percent are off-premises theft (personal items such as a GPS or laptop left in a vehicle) and 60 percent are on-premises thefts.

There are precautions homeowners can take to prevent having a claim this Halloween. Here are some Halloween safety tips from Travelers that agents can share with their customers:

  1. Watch out for trick-or-treaters

Image result for trick or treaters

Be cautious while driving, as trick-or-treaters populate the streets at night. It’s important to avoid distractions and drive at a safe pace, especially while in populated neighborhoods with people out and about.

  1. Stay alert when trick-or-treating

Image result for stay alert trick or treating

Like drivers, it’s important to stay alert when walking from house to house with trick-or-treaters. Encourage customers to talk to children about the importance of looking both ways before crossing the street. Trick-or-treaters should also carry a flashlight, wear reflective clothing if possible and avoid approaching homes that are dark.


  1. Don’t make your home welcoming to thieves

Image result for dark home on halloween

To help prevent theft, homeowners shouldn’t let homes appear unoccupied. Homeowners should leave the lights and/or TV on in the home to give the impression that someone is there. Another tip is to let neighbors who may be home know the homeowners will be away, asking them to key an eye on the place. Homeowners should also avoid leaving spare keys anywhere outside the home.

Insureds should check with their agents to make sure they have proper coverage to protect against Halloween risks. (Photo: iStock)

  1. Check your coverage and be prepared

Image result for insurance coverage

In the even that there is a theft, encourage homeowners to be prepared. Homeowners should make sure they have the right type and amount of insurance coverage. Creating a home inventory can speed up the claim process.

  1. Avoid fire hazards

Image result for jack o lantern halloween on fire

Pumpkin carving might be a tradition, but using candles can be a major fire hazard. When it comes to decorating, use lights and other electrical decorations that have been tested for safety. Look for a certification mark from UL, CSA, ETL or another nationally recognized laboratory. Never staple, nail through or fasten electrical wires or extension cords and plug all outdoor lights and decorations into ground-fault circuit interrupters to help reduce the risk of electric shock.


  1. Consider property risks

Image result for property risks halloween extension cords

Homeowners should check the outside of their home to identify and minimize potential dangers, especially those difficult to see after dark. For example, check to make sure temporary extension cords are secured to avoid becoming a tripping hazard and walking surfaces are even, clear of debris and well lit.


  1. Don’t let your haunted house come back to haunt you

Image result for haunted house

Charging for admission for a haunted house can be considered a business activity. Let insureds know they should consult with their agent or insurance company representative to ensure they have the proper insurance coverage.


14 Low-Tech Ways to Keep Your House Warm Over the Winter

By Tom Heyden
BBC News Magazine

ways to keep house warm

1. Use tin foil. One way to prevent unnecessary heat loss from radiators, particularly on those attached to external walls, is to use heat reflective aluminium foil behind the radiator. This prevents heat disappearing through the wall by reflecting it back into the room, says Sophie Neuburg, energy campaigner for charity Friends of the Earth. Foil specially designed for the purpose can be bought for under £10. “You can even use good quality kitchen foil,” says Carl Brennand, assistant manager of website Moneymagpie, although it’s generally not as effective.

2. Thick curtains are one of the main ways to protect your house from losing heat through the windows. Curtains with a thermal lining are a relatively cheap option, says Brennand. “The thicker the better,” adds Archna Luthra, consumer analyst at moneysavingexpert.com. If you don’t want to splash out on new curtains you can line them yourself with materials like cheap fleece, says Brennand. “You can even use PVC shower curtains,” he suggests. And it’s not just windows that can have curtains. Placing a curtain in front of doors to the outside adds another layer of protection. And it doesn’t even need to be a curtain. “My gran used to have an old rug that she used to pin up over the back of the front door,” says interior designer Claire Potter.

Sunlight through net curtains

3. But let the sunlight in during the day. It’s important to try to use as much natural – and free – heat (in the form of sunlight) as possible. Window shades and curtains should be kept open during the day, advise Age UK. Closing your curtains as soon as dusk falls will maximise your house’s potential to retain that heat.

4. Double glazing is heat-efficient but it’s relatively costly. If you can’t afford it, why not fake it? “There’s a special film that you can put across [single-glazed] windows” that can imitate the same effect, albeit to a lesser degree, says Neuburg. You can attach the film to the window frame using double-sided tape and then fix it using a hairdryer, she says. There’s a downside. You won’t be able to open your windows without breaking the seal. But a pack to cover a medium-sized house would be about £15, estimates Potter, so it could just be redone from time to time. Potter, who has no heating system in her house, says one batch of film has lasted about two or three years as she has small windows. Alternatively, self-adhesive foam strips can help seal any gaps in the edges of windows. Metal or plastic strips with brushes or wipers attached cost a bit more but will last longer as a result, according to the Energy Saving Trust. These can also be used as draught excluders around the hinges and frames of doors.

Smoking chimneys

5. Stop heat being lost up the chimney. It’s now fairly common to have fireplaces that are merely decorative. If you’re not using yours then you should consider a chimney balloon, says Potter. “There’s an amazing amount of heat that can be lost through an open fireplace,” she says. A chimney balloon, made from a special laminate, can be bought for about £20 and works by being placed inside the chimney hole, just out of sight. It’s then inflated until it completely shuts out any incoming cold air or escaping heat. Just be sure not to start a fire without removing it. There are also woollen chimney insulators on the market. But again, make sure you remove them before starting any fires.

Cat coming into house through cat-flap

6. Watch out for mini-draughts. “Lots of draught comes through the letterbox,” says Potter. It’s worthwhile putting an extra barrier there in the form of a “brush”. They may be a nightmare for junk-mailers trying to force through that 15th pizza takeaway offer, but they could prevent a chill breezing through the house. The same goes for keyholes, which can be protected with “simple circular (keyhole covers) that slip over the top”, says Potter, especially with the older, wider keyholes. Cat or dog flaps can also be filled with some sheep’s wool insulation or pieces of blanket. “It’s amazing how even a small draught can make a room a lot colder, so if you can cut that bit of air out it immediately makes a difference,” says Potter.

7. DIY draught excluders are one lesson people can learn from previous generations. “Old-fashioned draught excluders work well,” says Potter. “In the past it wasn’t unusual to have a ‘sausage dog’,” says Potter. For the uninitiated, “sausage dog” draught excluders are vaguely reminiscent of the shape of a dachshund and typically rest at the bottom of doors, stopping heat escaping through the gap between door and floor. Anybody who’s ever been smoking inside a room that they shouldn’t will probably be aware that almost any material or piece of clothing can be used to wedge the space. And simple draught excluders can be made from cutting an old pair of tights and stuffing them with socks, says Luthra. But the more ambitious can go further. “If you really want to go all out you can decorate them,” she says. The stuffing can be almost anything from rice and lentils to gravel, suggests the website Singerdiscount, which also provides a relatively simple guide.

8. Clear your radiators. Try and avoid placing large pieces of furniture in front of them. At least in the short-term, the sofa you love by the radiator is absorbing heat, says Neuburg.

Dog in dog bed in front of radiator

9. Putting a shelf above the radiator, especially if you have high ceilings, can also help channel the warmth, adds Neuburg. But it’s important not to place things on the radiator itself, she says, “You can put a shelf above it to stop the hot air rising directly above it.” This is particularly the case if the radiator is below a window with curtains, where warm air would be trapped between the window and the curtain.

10. Shut up unused rooms, says Neuburg. Keeping doors closed will prevent cold air moving into the rest of the house and contain the heat you’ve generated in a smaller area.

11. Cover bare floorboards. Floors account for as much as 10% of heat loss if they’re not insulated, according to the National Energy Foundation (NEF). Carpets came into being for a reason, says Potter. Those with wooden flooring have to deal with heat loss. Rugs and blankets can help mitigate this and have the added bonus of keeping your feet warm. “Sometimes it’s just the psychological element,” says Potter. But if there are cracks or gaps in the flooring it’s a good idea to squirt some filler into them, advises the NEF. “Floorboards and skirting boards can contract, expand or move slightly with everyday use, so you should use a filler that can tolerate movement,” suggests the NEF. These are usually silicone-based.

Man carrying insulation

12. Insulating your whole house professionally can seem expensive to some. But DIY loft insulation is a possibility. Rolls of foam insulation are cheap, says Brennand, and three rolls of 8in deep foam should be enough to give most lofts an important layer of protection. Mineral wool (such as Rockwool or Rocksil), glass fibre and recycled paper products all work well, according to the NEF. But remember to wear a facemask, goggles and protective clothing if you do it yourself, and leave sufficient gaps around the eaves to avoid condensation, the NEF warns.

13. Don’t undo your work by having an inefficient loft hatch, says Potter. “Some people might have a lovely insulated loft but the loft hatch might be an old timber one that’s not insulated,” she says. Insulating it can be done with same self-adhesive strips as for window and doors. It’s also worth checking that none of your roof tiles is loose or missing. “If you have loose tiles or a damaged roof then you’re going to get water that can get into your loft and as soon as the insulation gets wet it loses its efficiency,” she says. Although the difficulty of checking may be the biggest obstacle, if it’s safe to do so then a single tile or so can be relatively cheap to replace.

14. Setting timers on heating is important. “It’s a myth that keeping it on all day is better,” says Luthra. If it’s very cold, the timer should be set to switch the heating on earlier, rather than turning the thermostat up to warm the house rapidly, according to Age UK.


Autumn Maintenance Tips


Use these must-do fall maintenance tips to keep your house in shape and help keep you warm this winter.

Stylish Bookshelves in Romantic Master Bedroom


  • Regularly clean gutters and downspouts. Make sure all drainage areas are unblocked by leaves and debris. Consider installing gutter guards to make the job a lot easier.
  • Use a screwdriver to probe the wood trim around windows, doors, railings and decks. Use caulk to fill the holes or completely replace the wood.
  • Lower humidity and cooler (not yet cold) temperatures make fall a good time to paint the exterior of your home.
  • Inspect your roof, or hire a licensed professional to examine your roof for wear and tear. If the shingles are curling, buckling or crackling, replace them. If you have a lot of damage, it’s time to replace the entire roof. Also, check the flashing around skylights, pipes and chimneys. If you have any leaks or gaps, heavy snow and ice will find its way in.
  • To prevent exterior water pipes from bursting when the weather gets below freezing, turn off the valves to the exterior hose bibs. Run the water until the pipes are empty. Make sure all the water is drained from the pipes, if not; the water can freeze up and damage the pipes.
  • Have your wood-burning fireplace inspected, cleaned and repaired to prevent chimney fires and carbon monoxide poisoning.
  • Wrap water pipes that run along exterior walls with heating tape. It will save energy and prevent them from freezing.
  • Clean and replace filters in your furnace or heating system. Contact a licensed heating contractor to inspect and service your gas heater or furnace to avoid carbon monoxide poisoning. Your local utility company will often provide this service for free.
  • If you use a hot water system for heating, drain the expansion tank, check the water pressure, and bleed your radiators.
  • Check the attic to make sure the insulation is installed properly. The vapor barrier on insulation should face down toward the living space. If it is installed incorrectly (with the vapor barrier facing up) then the insulation will trap moisture causing possible water problems. Cut slits in the vapor barrier to allow moisture to escape. To install attic insulation, unroll the insulation with the paper side out. Install small pieces of insulation between the joists on the attic floor. Be careful not to step between the joists.
  • 0145334_weatherstripping_s4x3
  • The change in temperature and humidity and normal wear and tear can cause window seals to crack and shrink. Check your windows and doors inside and out for leaks and drafts. Caulk cracks or install weather stripping around windows and doors, including the garage door. Replace screens with storm windows and clean them if needed.


  • Fall is the perfect time to divide or move perennials. Remove dead annuals and mulch hardy perennials. Annuals typically die when temperatures drop below freezing. But perennials often appear as though they too have bitten the bullet. That’s because their top growth dies back, although in most cases the root ball is hardy enough to survive even extreme temperatures, especially if it’s covered with a layer of mulch.
  • The best time to mulch perennials is after the first hard freeze. Just make sure you don’t cover the crown or center of the plant, because that can lead to rot.
  • Clean garden tools before storing for the winter.
  • Trim dead branches out the trees to prevent them from coming down and causing damage in a winter storm.
  • iStock-04657370_Boy-Raking-Leaves-Autumn_s3x4
    • Rake up the thick layers of leaves that settle on lawn surfaces. Large leaves in particular, especially when they get wet, can compact to the point where they suffocate the grass below and lead to all kinds of insect and disease problems. So it’s a good idea to routinely rake or blow them off the lawn or, better yet, use a mulching mower to shred them into fine pieces.
    • Put the raked leaves in the compost pile or use as a mulch. Whatever you do, don’t waste fallen leaves because they’re an excellent source of nutrients and organic matter. You can also add them to flower beds to put a winter blanket on your garden.
    • Fall is a good time to aerate your lawn; it will allow moisture and nutrients to get into the roots. When you’re done, spread fertilizer then grass seed.
    • This will be the ideal time to sow cool-season grasses such as fescue and rye – it will give them the opportunity to germinate and develop a good root system before freezing temperatures arrive. It’s also the right time to fertilize turf grasses, preferably with slow-release, all-natural fertilizer. When given adequate nutrients, turf grasses have the ability to store food in the form of carbohydrates during the winter months. That will mean a better-looking lawn come spring.
    • Pests love attics because they are full of nice warm insulation for nesting, and they offer easy access to the rest of the house. With gable vents that lead into the attic it is a good idea to install a screen behind them to keep those critters out.
    • Even after closing off those entryways, pests can still find a way in. The first place to check for any unwanted guests is under the kitchen cupboards and appliances.
    • Each fall, check carbon monoxide detectors and smoke alarms and put in fresh batteries. These are very important detectors to have in a home. A smoke alarm can save lives in a house fire. A carbon monoxide detector can also save lives if a home has oil or gas-burning appliances, like a furnace or water heater.
    • Carbon monoxide is an invisible, odorless byproduct of burning oil or natural gas, and it can be deadly. For just a few dollars, a carbon monoxide detector will sound an alarm if the levels get too high.
    • Always install carbon monoxide detectors according to manufacturer’s instructions. Generally they should be installed near each potential source of carbon monoxide, and within ear shot of the living and sleeping areas.

First day of fall 2016 is today: What is the autumnal equinox?

Temperatures may still be warm outside but today is the first day of fall.

The autumnal equinox as seen from space. (Contributed photo/NASA)

Sept. 22 is the autumnal equinox, the time when the sun crosses the celestial equator, the imaginary line in the sky that corresponds to the earth’s equator. The autumnal equinox – also known as the September or southward equinox – occurs between the 21st and 24th of September each year.

On the equinox, the sun rises directly in the east and sets directly in the west with a location above the equator illuminating the Earth from pole to pole. Before the autumnal equinox, the sun rises and sets more to the north; afterwards it shifts more southward.

The autumnal equinox is the first day of fall north of the equator; it’s the first day of spring in the southern half of the world.

When is the start of fall?

The autumnal equinox, the start of fall, will officially arrive at 10:21 a.m. EDT on Thursday.

Here’s a breakdown of fall’s official arrival for other times zones:
Central Daylight Time: 9:21 a.m.
Mountain Daylight Time: 8:21 a.m.
Pacific Daylight Time: 7:21 a.m.

After the equinox – Latin for “equal night” – the days in the Northern Hemisphere will get shorter until the winter solstice in December. On Thursday, the sun will rise at 6:44 a.m, EDT and set at 6:52 p.m. EDT. The exact equal day and night won’t actually occur until a few days later on Sept. 25 with sunrise at 6:47 a.m. EDT and sunset at 6:47 p.m.

The autumnal equinox is the second that occurs each year. The first is the vernal equinox which occurs around March 20 or 21 and marks the beginning of spring.

While the autumnal equinox marks the beginning of fall for astronomical watchers, it’s not often used by meteorologists and climatologists. As the National Oceanic the Atmospheric Administration explains, the difference is because the astronomical seasons are based on the position of the Earth in relation to the sun, while the meteorological seasons are based on the annual temperature cycle.

My Homeowner’s Policy Covers That?

homeowners policy

Most homeowners purchase a standard homeowners’ insurance policy and rarely take the time to read it after they receive it from their agent.

They may skim it to determine what kind of coverage exists if their contents are lost or stolen, or if their hot water heater leaks, but most don’t give it a thorough review.

The Insurance Information Institute says that homeowners’ insurance provides coverage for the structure and contents (personal belongings), and additional living expenses if the home is unlivable because of a covered disaster like a fire, as well as liability protection against lawsuits, damage or injury family members or pets may cause to others.

As a homeowner, you probably think you have a pretty good idea of everything that your insurance policy covers. You might be (pleasantly) surprised to find that the policy actually covers more than just the run-of-the-mill accidents.

Here are some examples of other coverage that may be available under your policy. Granted, every policy is different, so make sure to read your policy or talk with your broker to verify what coverage actually exists.

Would You Like a Lower Premium? …. And Other Tricks Of The Property Insurance Carriers

Swiss_Cheese_GardenIt is an unassuming box to check off on your yearly premium invoice. Check this box if you would like a lower premium. Who wouldn’t want a lower premium? In reality by checking that box you are waiving some valuable coverage and you may never know what that is until you make a claim.

You are most likely changing your deductible from $500 to a percentage of your claims value which can end up costing you lots of money if you have a large loss in your home. Even if you changed your deductible to $1500 for a savings of $150 less it may take 7 years without any claims to reap any kind of financial benefit. Can you really afford that kind or risk?

Property Adjustment Corporation always recommends more coverage than passing it up. Some carriers like Erie offer great endorsements like the Roofing & Siding Endorsement is a must-have for homes that have siding on 3 sides or more of your home. If your siding/roofing is partially damaged it will pay to have all the siding/roofing is replaced so you do not have unevenly aged siding and everything matches perfectly.

Jewelry is another area that if you have some pricey pieces they should be appropriately insured. Most homeowners’ policies have a $2500 per item aggregate; that is $2500 total coverage for all pieces of jewelry. Unfortunately all Allstate policies have only a $1500 jewelry aggregate. If your jewelry collection is more valuable, PAC recommends getting a Blanket Jewelry Rider that can cover any item amount you decide to buy.

Our most important endorsement for anyone who keeps or who has a finished basement or keeps valuable items in storage down there is the HO-208 otherwise known as the Sump-Pump Rider which protects you in the event of a back-up of sewer and water. But look out most endorsements do not cover to the extent of the items kept in the basement. Travelers Sump Pump Rider can go as high as $25,000 in coverage but most carriers only offer $10,000 in coverage and again the far inferior Allstate policy only offers $5,000 of coverage for this endorsement.

What’s going on with Farmers Insurance? The Company that advertises about protection from “gaps in your insurance” is the same company that created more holes in coverage than a block of Swiss cheese! Farmer’s new Next Generation Policy covers far less than their previous HO 3 policy. In addition to taking away some of the “All Physical Risk Coverage” that protected you from window and roof leaks, Farmers decided to write out general contractor’s evaluation for property damage claims, thus reducing claim payouts by more than 20%. Who needs that? What does this mean? If you had a good experience with Farmers in the past there is no guarantee that your new Next Generation Policy will make you equally happy.

Check your policy before winter gets here! PAC always recommends finding an insurance broker that can pick from various carriers to get you a policy designed for how your home is built. If you would like questions answered about your policy our adjuster are available for policy reviews! We do not sell policies but we see how effective they are for their customers every day! For now the best advice we can give you is to stay from Allstate and any company that advertises excessively on television.

Should Your Roofing Contractor Adjust Your Insurance Claim?

Would you let your accountant cut your hair?

Roofer file insurance claims

Over the past few years we at Property Adjustment Corporation have noticed a trend in how contractors are marketing their services. They include “help with your insurance claim” among their list of services offered. It seems like a good idea to the homeowner to have one point of contact for both the claim and the reconstruction process after major sudden and accidental damage to their home, but it will not always get the best outcome.

It is not only fraudulent to practice as an unlicensed public adjuster in Pennsylvania and New Jersey, but the contractor cannot get the comprehensive entitlement like a seasoned public adjuster… what the contractor will get is their own bill paid.

We recently helped a Lansdale, PA homeowner after his roofer had an unsuccessful effort in getting a new $5,000 roof after he experienced damage from a windstorm last winter. The roofer was frustrated after only being able to get $1,000 to replace 20 shingles on one side of the roof.

There was much more than 20 shingles worth of damage not to mention with only a patch work fix the homeowner would be experiencing more roof problems down the road. When our PAC adjuster came to the home and examined the damage and the homeowner’s policy- he found entitlement to $8,300 for interior damages the roofer was never interested in getting for the homeowner.

As for the roof, we tried many common sense arguments for the new roof that were denied 4 times by the insurance company. Finally, we had to use case law proving diminutive value, that the insurance company’s decision not to provide the homeowner with a new roof would substantially lower the value of the insureds home. It was then they agreed to pay in full for the new roof. After using the services of a public adjuster the homeowner got much more than he ever set out for because he had the aid of someone who knew EVERYTHING he was entitled!

As a licensed public adjuster you must pass a state licensing exam and you have to take credited courses each year to remain licensed. This continuing education keeps you abreast of all case laws that help the consumer. Will someone who is practicing as an unlicensed public adjuster take any extra steps to stay abreast to changing laws? Property Adjustment Corporation is also an active member in national and local organizations such as NAPIA and MAPIA that fight to keep insurance policy products less ambiguous and fair to the policy holder. All PAC adjusters come to the table with over 20-years of experience adjusting claims either for the policy holder or on the “other side” for the insurance companies.

If you think you a killing two birds with one stone by letting your contractor handle your insurance claim you may just be killing your potential for a higher settlement!

Exact Words For Frozen Pipe Claims

Some of us may be old enough to remember the trouble that Greg Brady got into over “exact words” in the classic Brady Bunch episode. Calling in a frozen pipe homeowners  insurance claim to your carrier yourself can easily turn into a costly mistake if it leads to a denial of coverage.

There are two magic words the carriers need to hear to cover a frozen pipe loss and if they don’t get said in your initial statement you may be in trouble.

Making Property Adjustment Corporation your first call before your insurance company can save you money in the long run. We present your frozen pipe claims to the insurance company for the maximum entitlement your policy allows for the damage to your home.